Keywords and the planner
A keyword is one article waiting to be written. This page covers how you get keywords, what the calendar does with them, and how to change one before it turns into an article.
Two screens in the sidebar show the same keywords. Content Planner lays them out on a month calendar, one card per day. Keywords shows them as a table you can filter by status. Anything you do in one shows up in the other.
First, give it something to research
PressLoom researches keywords from three things: your website, the competitors you list, and the customers you say you want. Your website comes from onboarding. The other two you enter yourself, under Settings, General Settings, Audience & Competitors.
You need at least one of the two before keyword research will run. With neither set, Generate Keywords stops and tells you to add them in Settings first. One target audience and one competitor is enough to start, and both fields hold up to seven entries.
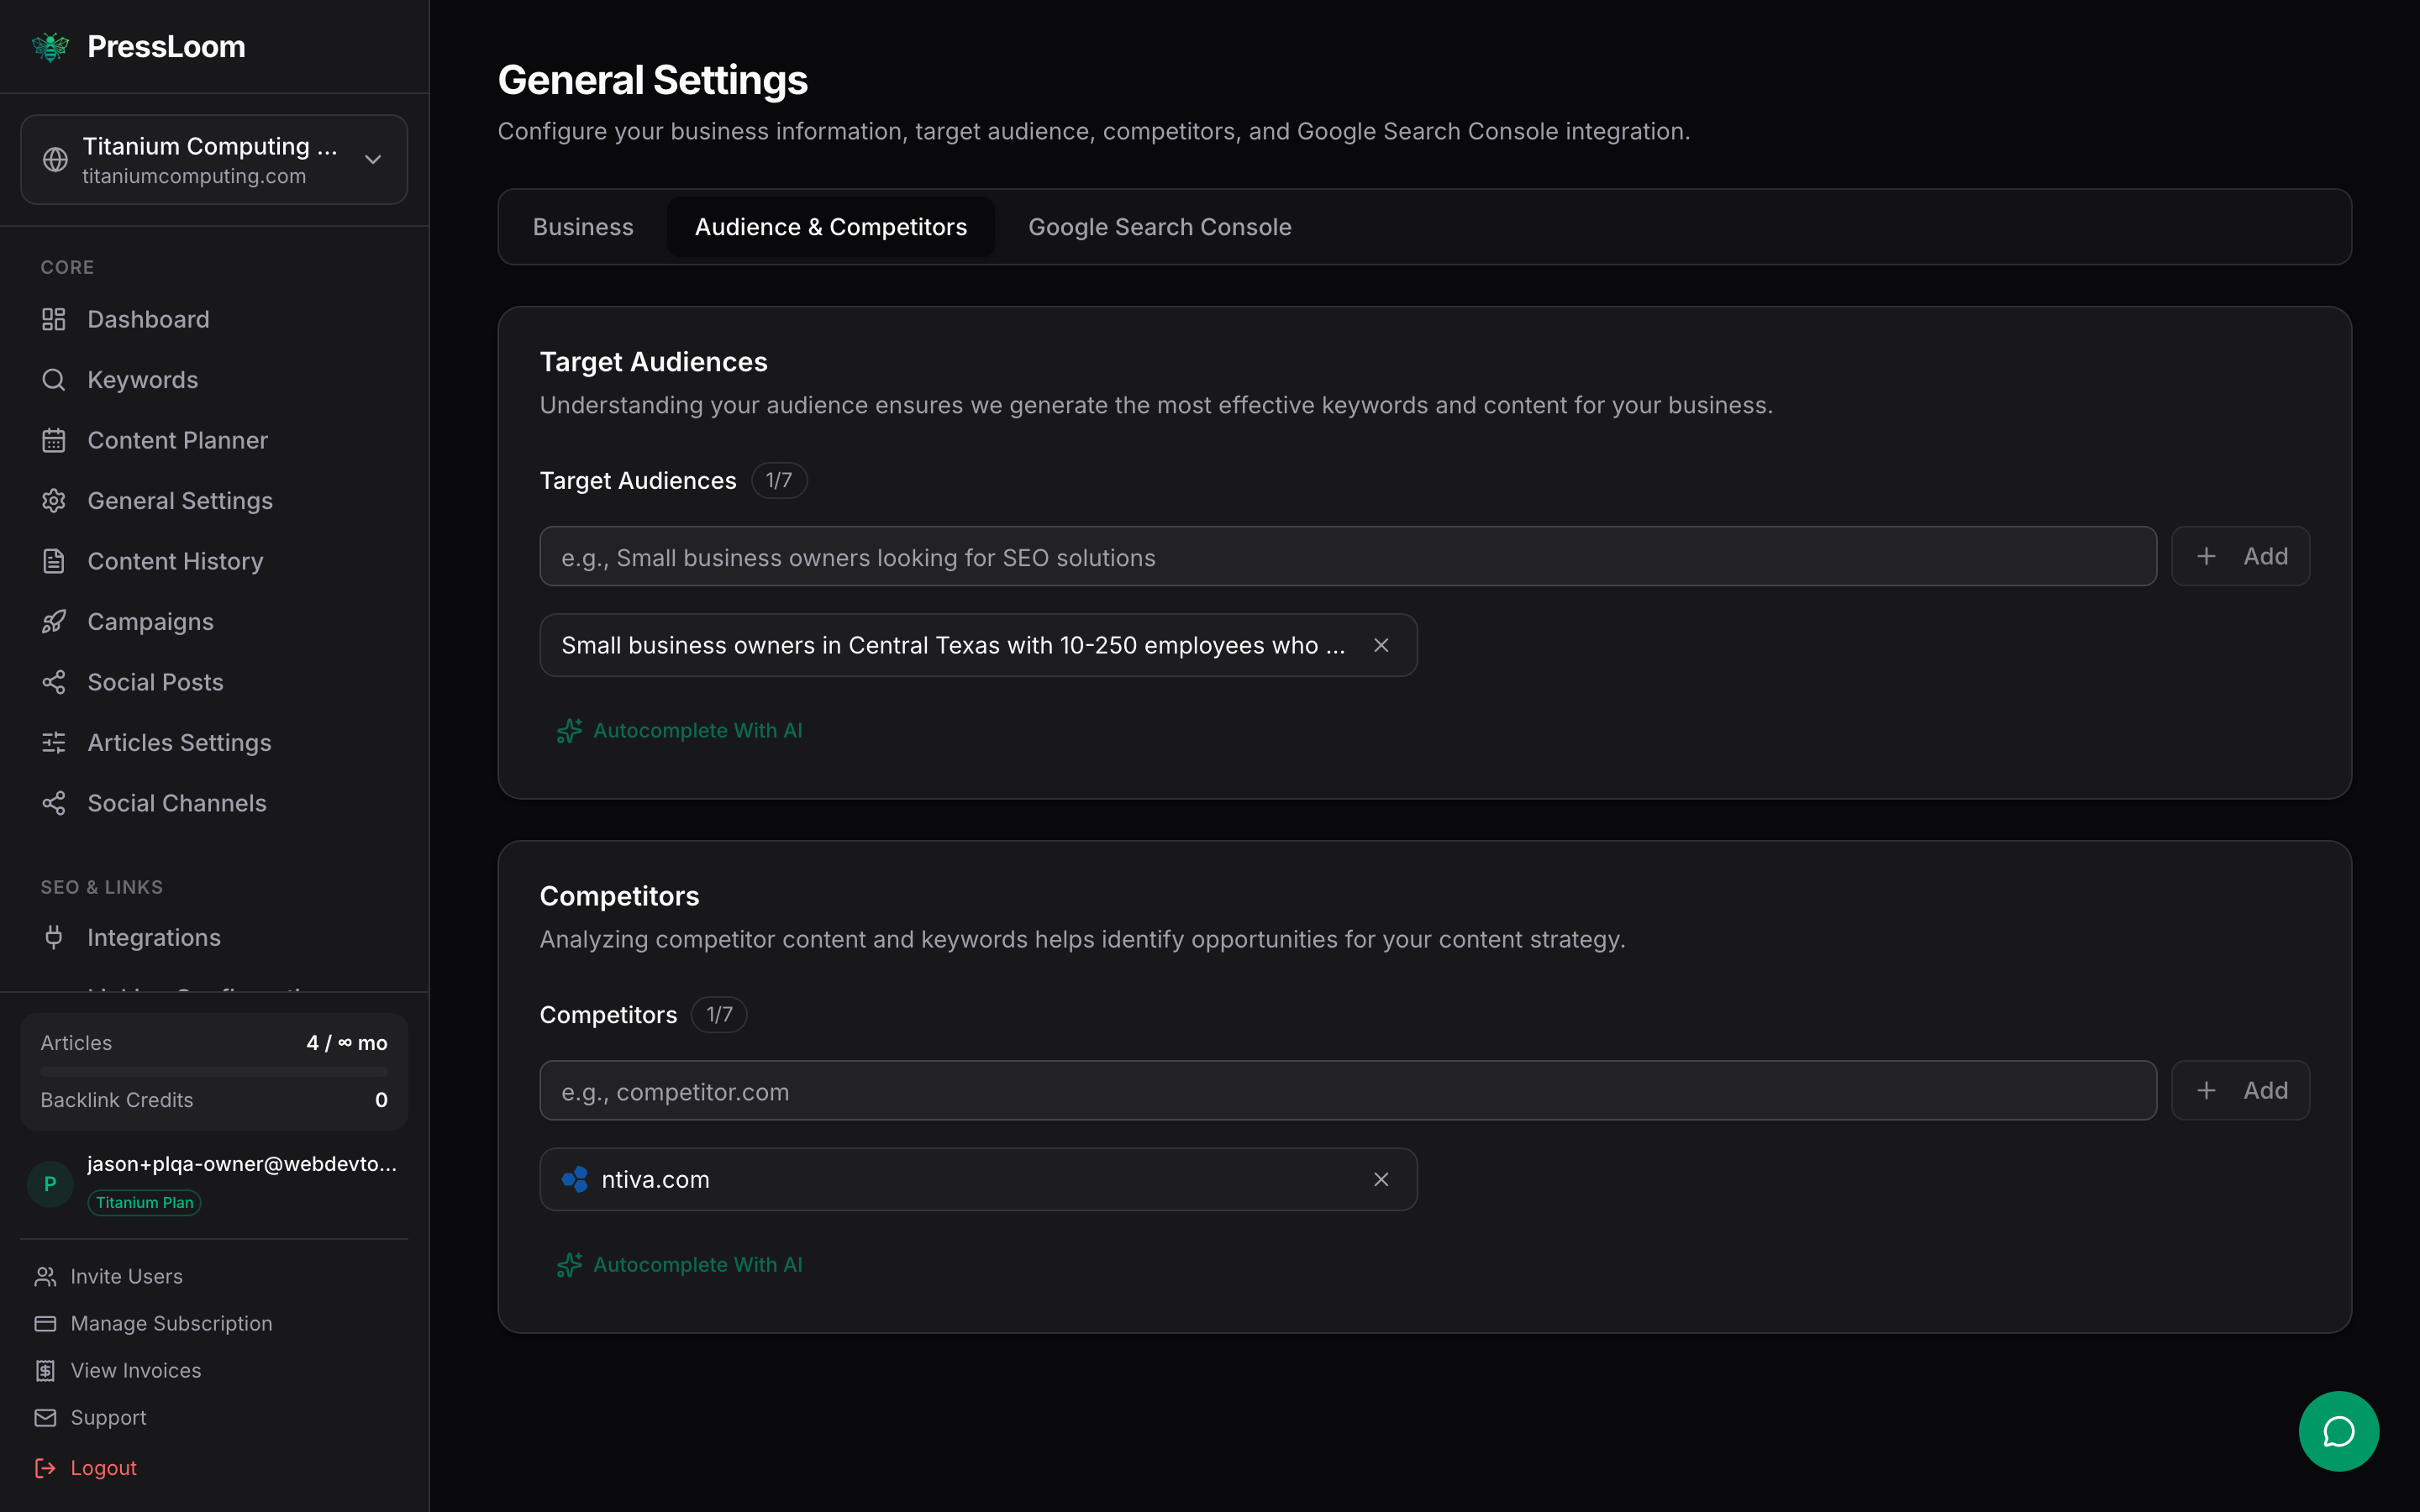
Be specific in the audience field. "Small business owners in Central Texas with 10 to 250 employees" produces better keywords than "businesses". There is an Autocomplete With AI link on both cards if you want a starting point to edit.
Generate Keywords
Open the Content Planner and click Generate Keywords. The dialog explains what it is about to do. Click the green Generate Keywords button to start it.
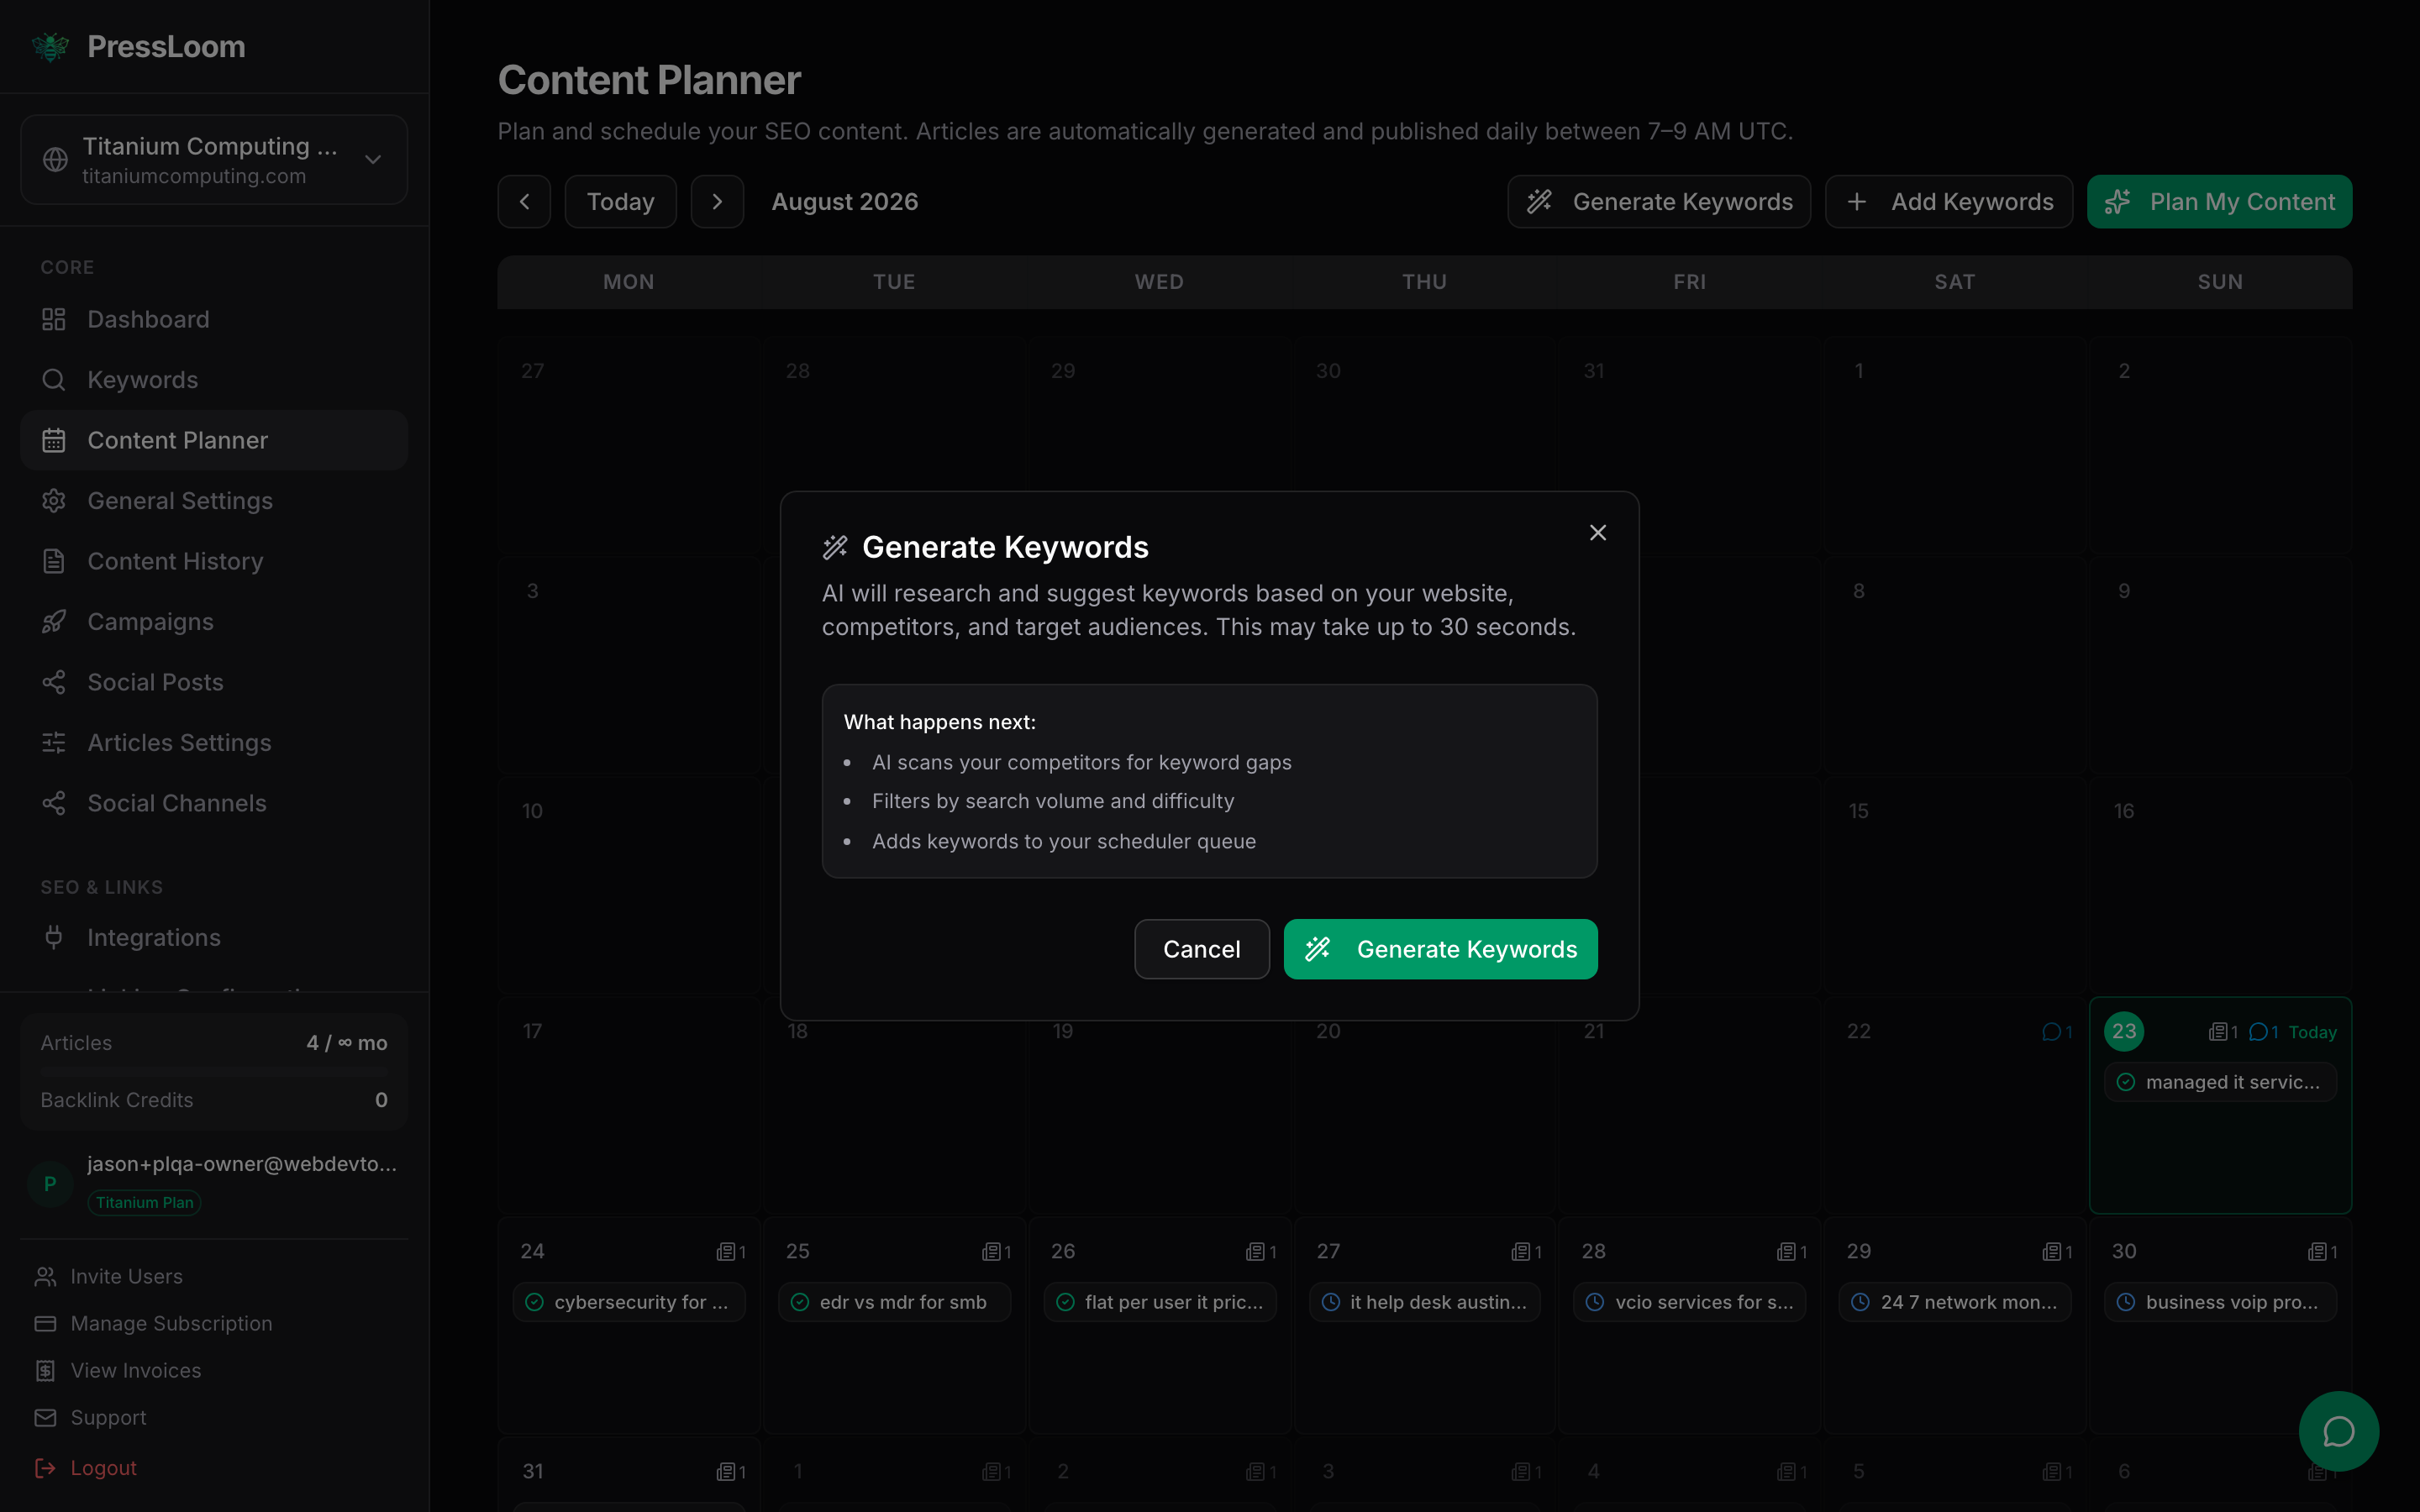
The dialog says up to 30 seconds. Filling an empty queue takes longer than that, because it researches in batches. Leave the tab open until it finishes.
When it is done, the new keywords are on the calendar, one per day, starting tomorrow. Each one already has a suggested article type, an estimated search volume and an estimated difficulty. The same button lives on the Keywords page as Research Keywords and does exactly the same thing.
You can hold 60 active keywords per website. Active means anything not yet written. Generate Keywords fills the empty slots, so on a fresh site the first run gives you about two months of articles. If you are already at 60 it will tell you to remove some first, and running it again later only tops you back up to the cap.
They are estimates produced by the same research pass that found the keyword, not measurements from a paid SEO data service. Use them to sort your queue, not to report to anyone. Difficulty runs 0 to 100, where roughly 0 to 20 is easy, 20 to 40 is moderate, 40 to 60 is hard and anything above 60 is a fight. Lower is better, and low volume is fine if the search is one your buyers actually make.
What the calendar shows
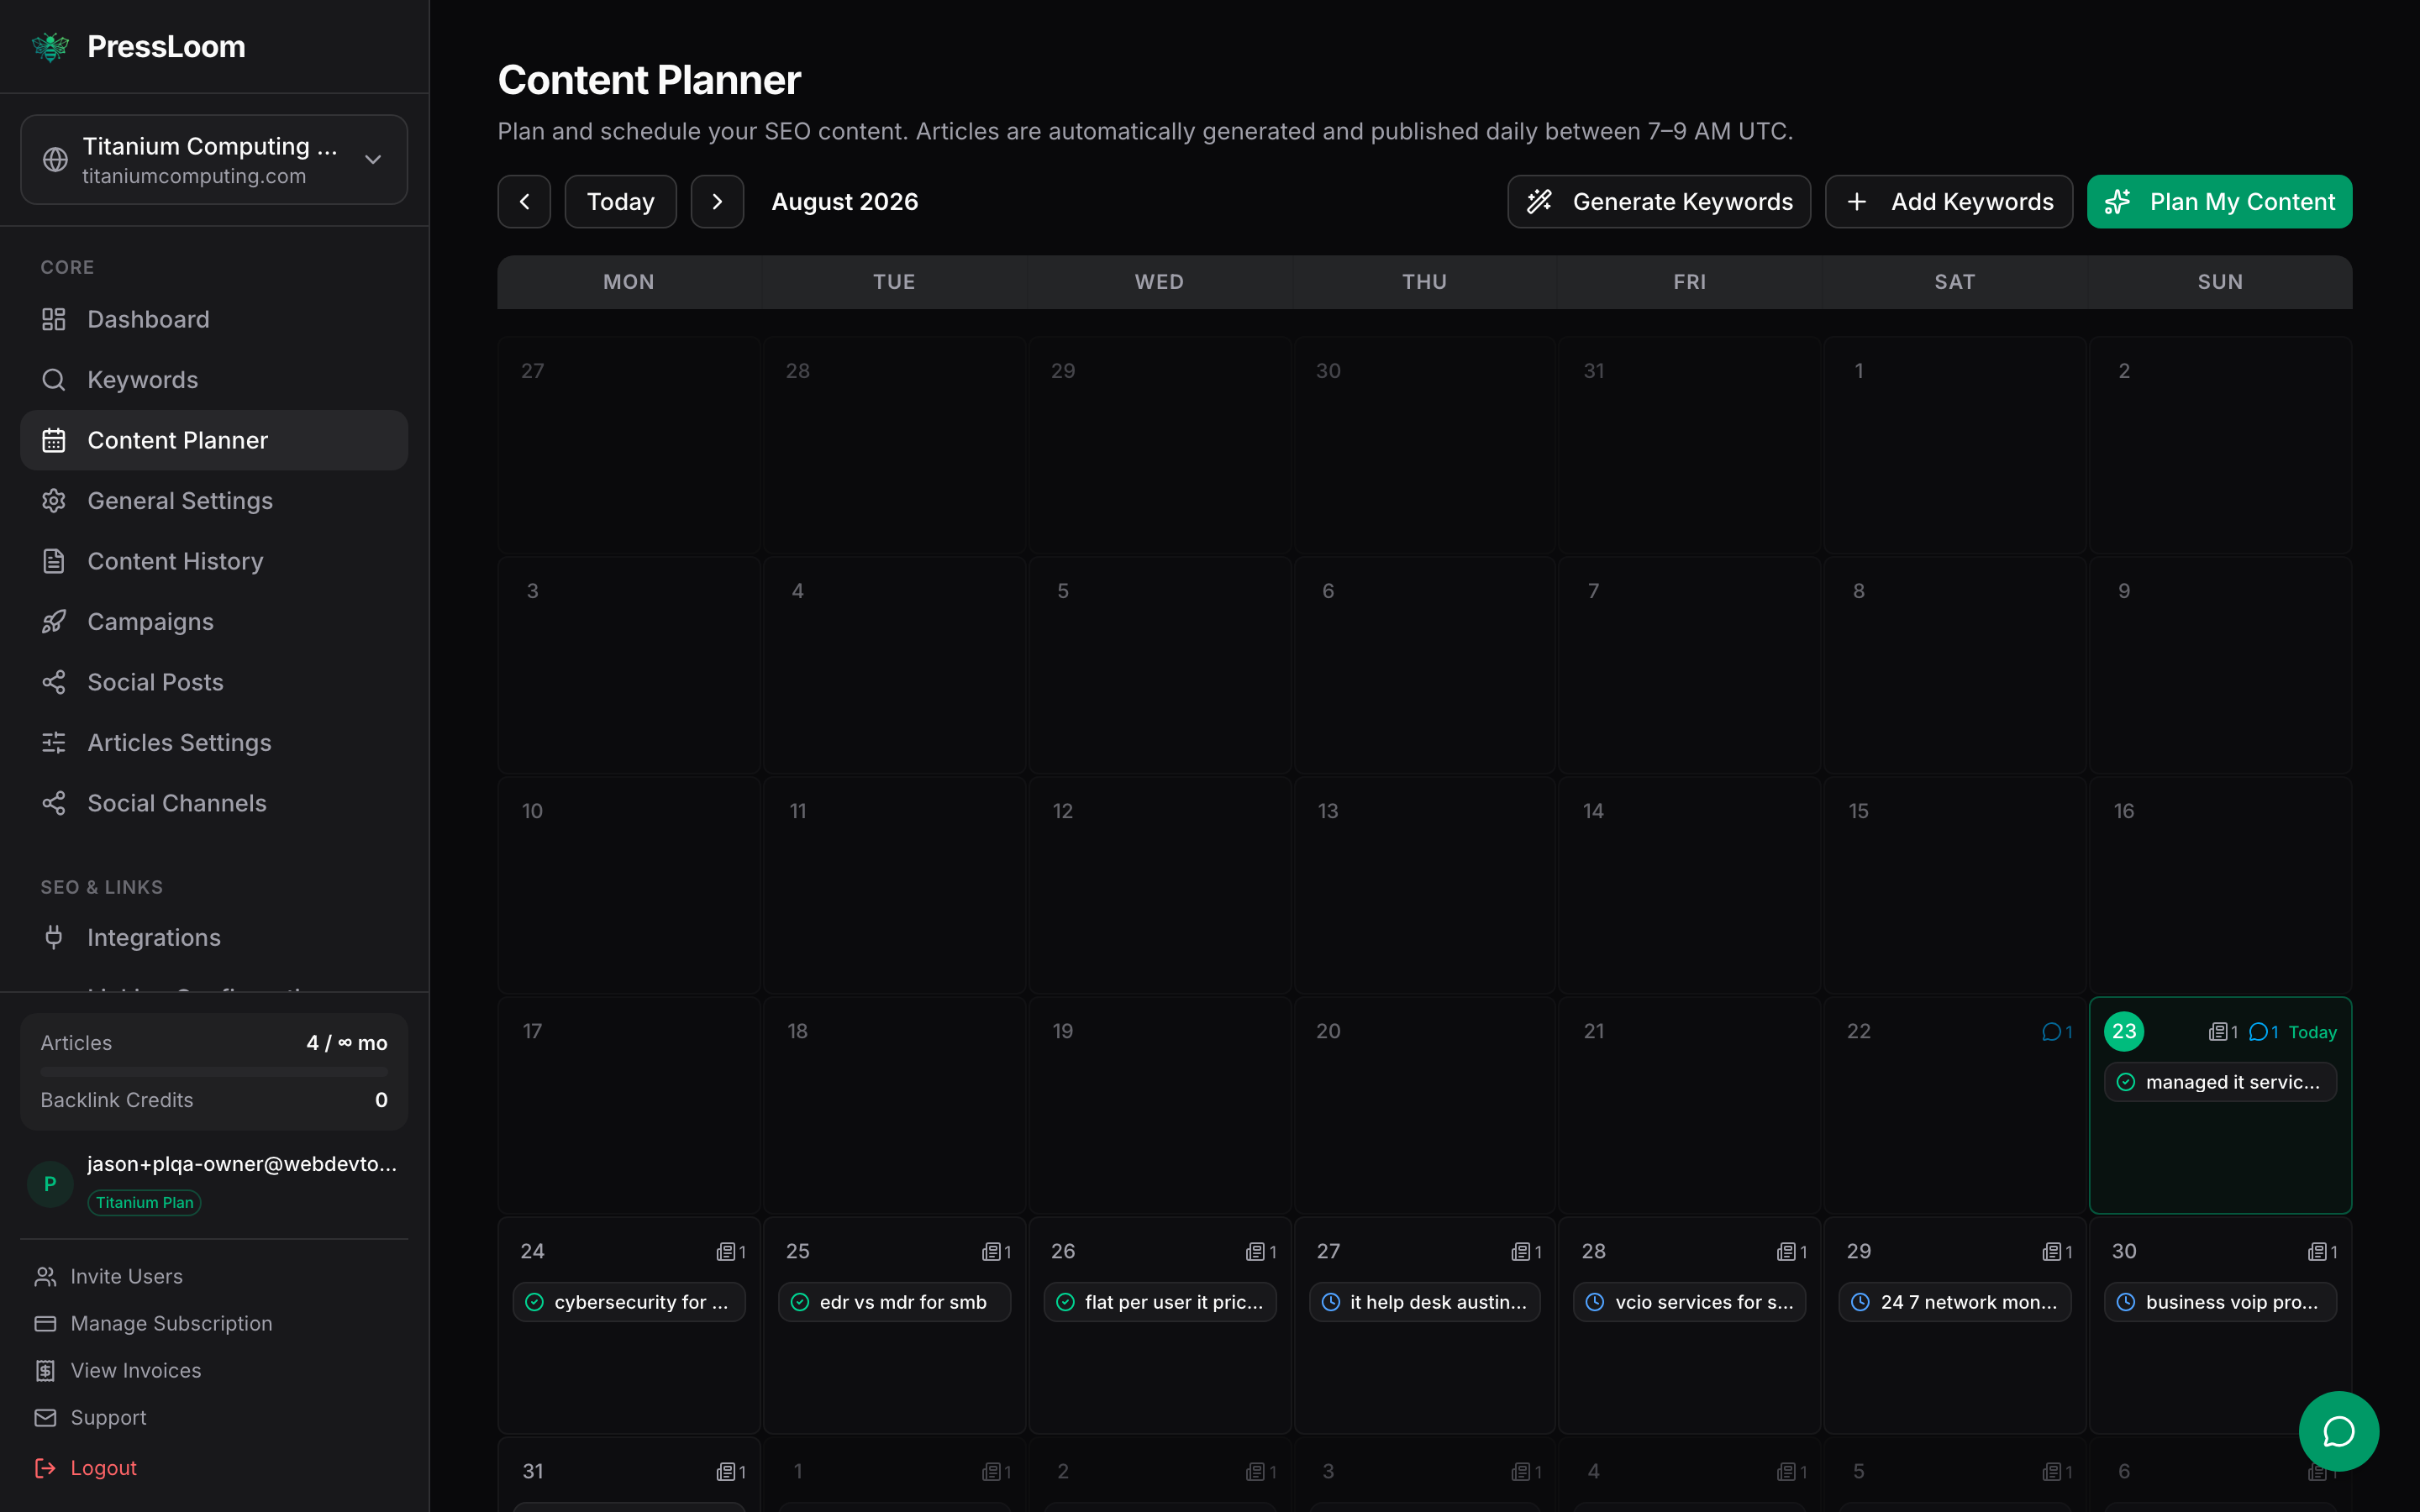
Each day holds the keywords scheduled for that day, one card each. A small counter in the corner of the cell tells you how many are on that day. Empty days still to come show a dashed box reminding you that you can drag a card in.
To move an article to a different day, drag its card onto the day you want. That is the whole scheduling model. There is no separate reschedule screen.
The planner page says articles are generated and published daily between 7 and 9 AM UTC. That is what the schedule does once background processing is enabled for your account. Until it is, nothing writes itself on a timer and the dates are your plan rather than a promise. You generate each article yourself from the card. Ask Titanium where your account stands if you are not sure.
Keyword cards and what the icons mean

In the grid a card is one line: a status icon and the keyword. Hover it, or click it, and the full card opens with everything else.
| Status | What it means |
|---|---|
| Scheduled (blue clock) | Nothing written yet. It is sitting on that date waiting for you or for the daily run. |
| Pre-Created (violet eye) | The article exists as a draft because you asked for one without publishing. The daily run leaves these alone on purpose so you can read it first. |
| Generating (amber) | The article is being written right now. This takes a couple of minutes. |
| Published (green check) | The article is finished. Whether it reached your website depends on your integration, which the Articles page covers. |
| Failed (red) | Generation did not complete. The card offers a Retry. |
The open card shows the article type as a badge, the working title, the estimated volume and difficulty, and a New badge if the keyword was added in the last two days. Under that are the buttons, which change with the status:
- Pre-Create writes the article and leaves it as a draft for you to read.
- Create & Publish writes it and sends it on to your website if you have an integration connected.
- Visit Article opens the finished article.
- Retry tries a failed keyword again.
Generating an article takes about two minutes. Keep the tab open while it runs. What happens after that, editing, downloading and publishing, is on the Articles page.
Four small icons appear along the bottom of the card when you hover it: a lightbulb for quality questions, sliders for article type settings, a pencil to edit the keyword text, and a red bin to remove it. The first two are worth knowing about and are covered below.
Add Keywords yourself
Research is not the only way in. If you already know what you want written, click Add Keywords on the planner, type the phrase and add it. There is also an Add Keyword button on the Keywords page that does the same thing.
Write it the way a customer would type it into Google. "flat per user it pricing" beats "our pricing model". Once it is in, drag its card to the day you want it written, or open the card and generate the article straight away.
Keywords you add by hand have no volume or difficulty estimate, because nothing researched them. That is fine. They still generate exactly the same way.
Plan My Content
The green Plan My Content button takes the keywords you already have and works out the shape of the run: a working title and an angle for each one, and dates spread across the next few weeks instead of one flat article a day. It looks at the articles you have already published so it does not plan the same piece twice.
It needs keywords to work with, so the button stays greyed out until something is scheduled. Generate or add keywords first, then plan. You can run it again later after adding more keywords.
It changes the plan, not the writing. Nothing is generated and nothing is published by this button.
The Keywords page
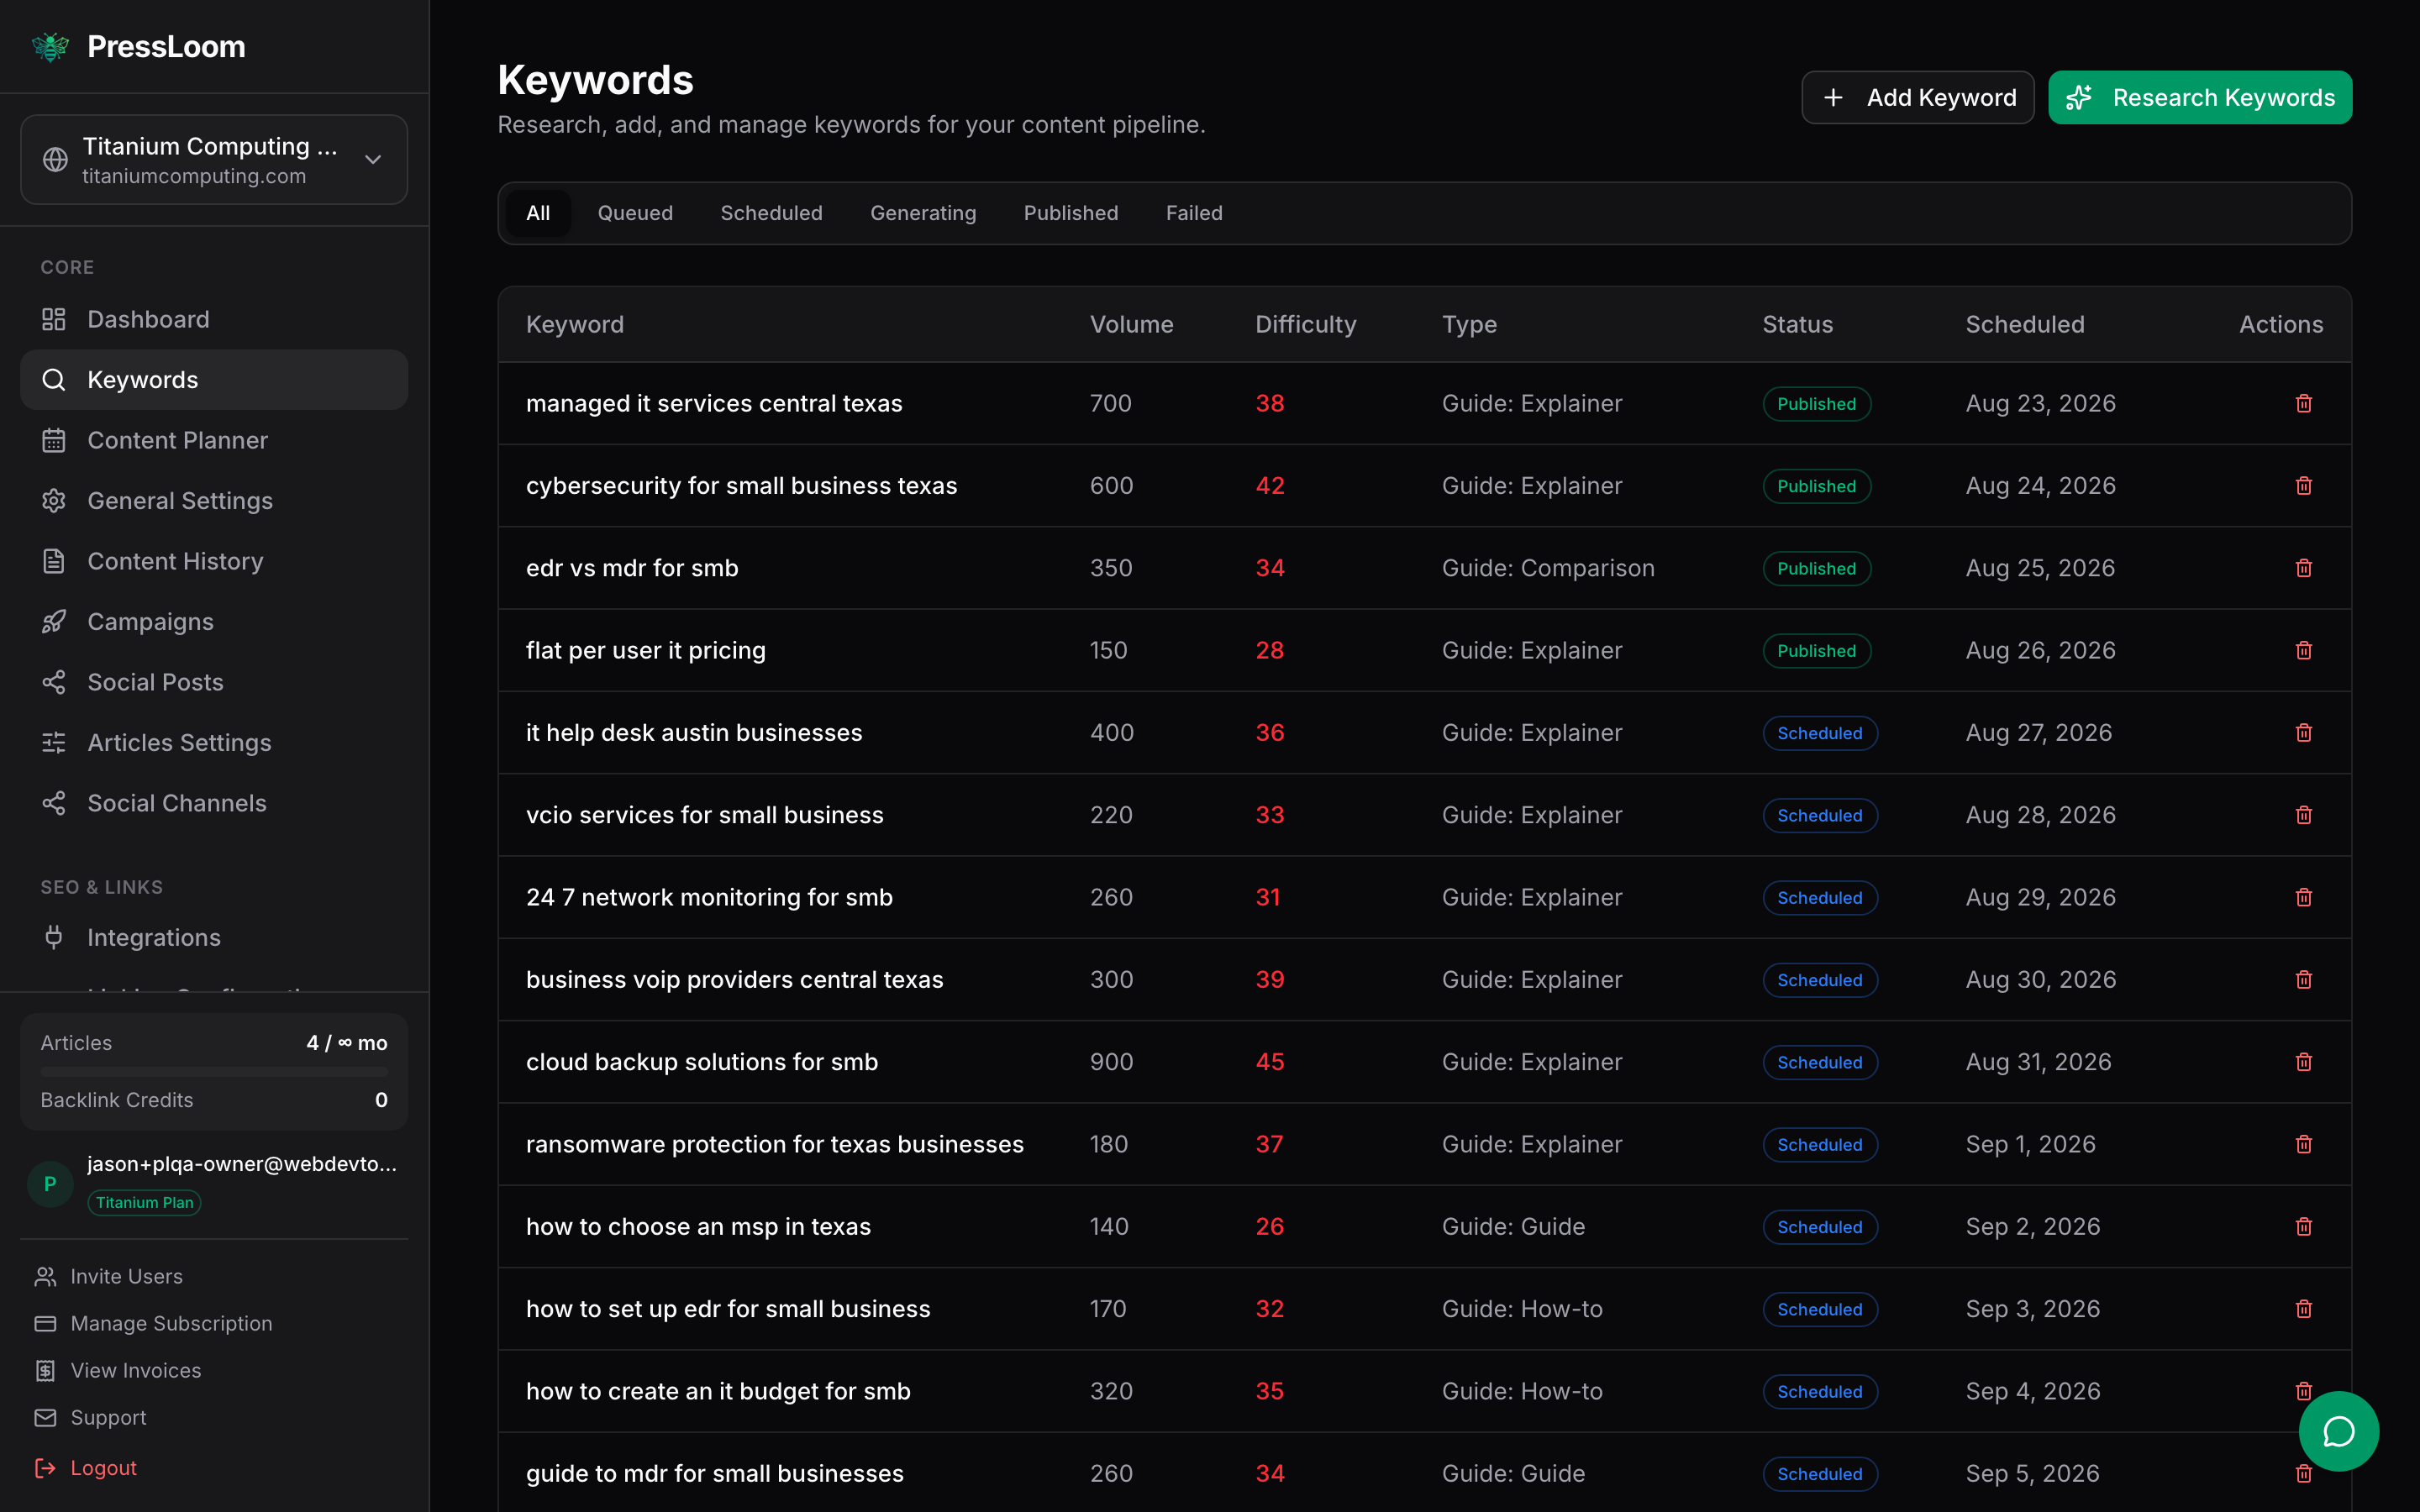
The tabs across the top filter by status: All, Queued, Scheduled, Generating, Published, Failed. The table gives you the keyword, its estimated volume and difficulty, the article type PressLoom picked, the status, and the date it is scheduled for.
The Type column reads like "Guide: Explainer" or "Guide: How-to". That is the shape of the article, and you can change it per keyword from the planner card.
The list shows up to 100 keywords at a time. That covers the 60 you can have waiting, but published ones pile up behind them, so use the status tabs to narrow things down.
The bin icon at the end of a row deletes that keyword straight away, with no confirmation step. If you would rather be asked, remove keywords from the planner card instead, which does confirm. Either way, removing a keyword that already has an article does not touch the article. It only takes the keyword off the plan.
Per-keyword settings
Two settings live on the keyword card, both reached from the icon row that appears when you hover it. Neither is required. The defaults are sensible and most people never open them.
Article type and length
The sliders icon opens Article Type Settings. Pick Guide or Listicle. Guide then asks for a style:
- How-to walks the reader through a task step by step. Good for "how to" searches.
- Explainer explains a concept or a tool. Good for "what is" and "why" searches.
- Comparison puts options side by side so the reader can choose.
- Reference covers a topic thoroughly, for looking things up.
A Listicle is a numbered rundown of tips, tools or examples.
The same dialog sets Expected Length: Auto, Short at 1,200 to 1,600 words, Medium at 1,600 to 2,400, Long at 2,400 to 3,200, or Comprehensive at 3,200 to 4,200. Auto is the recommended setting and lets the length follow the topic. Save applies your choice to that keyword only.
The dialog also shows your target audiences at the top, as a reminder of who the article is being written for. That part is read-only. Change it in Settings.
Quality questions
This is the one setting worth your time. Click the lightbulb on a keyword card and PressLoom writes five or six short interview questions about that specific topic, the kind a writer would ask you before starting. Things it cannot know: how you actually price the thing, what goes wrong most often, the client story you tell on sales calls.
Answer as many as you like in a sentence or two each and click Save Answers. When that keyword becomes an article, your answers go to the writer as instructions, and the article comes out with detail no generic AI article has. Blank answers are simply skipped.
The questions are generated the first time you open the lightbulb, so give it a few seconds. Regenerate gets you a fresh set if they miss the mark, up to five times an hour. The lightbulb turns amber once a keyword has answers on it, so you can see at a glance which ones you have briefed.
Editing and removing keywords
The pencil icon on a card lets you fix the keyword text and add custom instructions for that one article. Instructions are free text: mention the town you serve, a product you want named, a claim you do not want made.
The bin icon removes the keyword from the plan after a confirmation. Deleting a keyword frees up a slot against the 60 limit, so clear out the ones that do not fit your business before generating more.
A sensible weekly routine
- Open the planner and look at the coming week.
- Delete anything that is not really your business.
- Open the lightbulb on the two or three you care most about and answer the questions.
- Generate those articles from the card, read them, publish the ones you are happy with.
- When the queue gets thin, run Generate Keywords again.
Next: Articles covers what happens after a keyword becomes an article.