Connect your site
Point PressLoom at WordPress or at a static site in a git repository so it can publish for you.
This is the one page in these docs written for whoever runs the website. If that is not you, hand this page to your web person. It takes about ten minutes either way, and it only has to be done once per website.
There are two paths, and you pick the one that matches how your site is built.
- WordPress. You install a small plugin called the PressLoom Connector, paste in a key, and PressLoom creates posts over your site's REST API.
- A static site whose source lives in a GitHub repository (Astro, Hugo, Jekyll, Eleventy, or a Claude Design site like titaniumcomputing.com). PressLoom commits a markdown file to your repo and your host rebuilds.
If your site is neither, talk to Titanium before you start. A few other platforms appear as tiles inside PressLoom but are not finished, and there is more on that at the bottom of this page.
Where connections live
Every connection belongs to one website. If you run several sites in PressLoom, switch to the right one in the product switcher at the top of the sidebar first, then open Integrations.
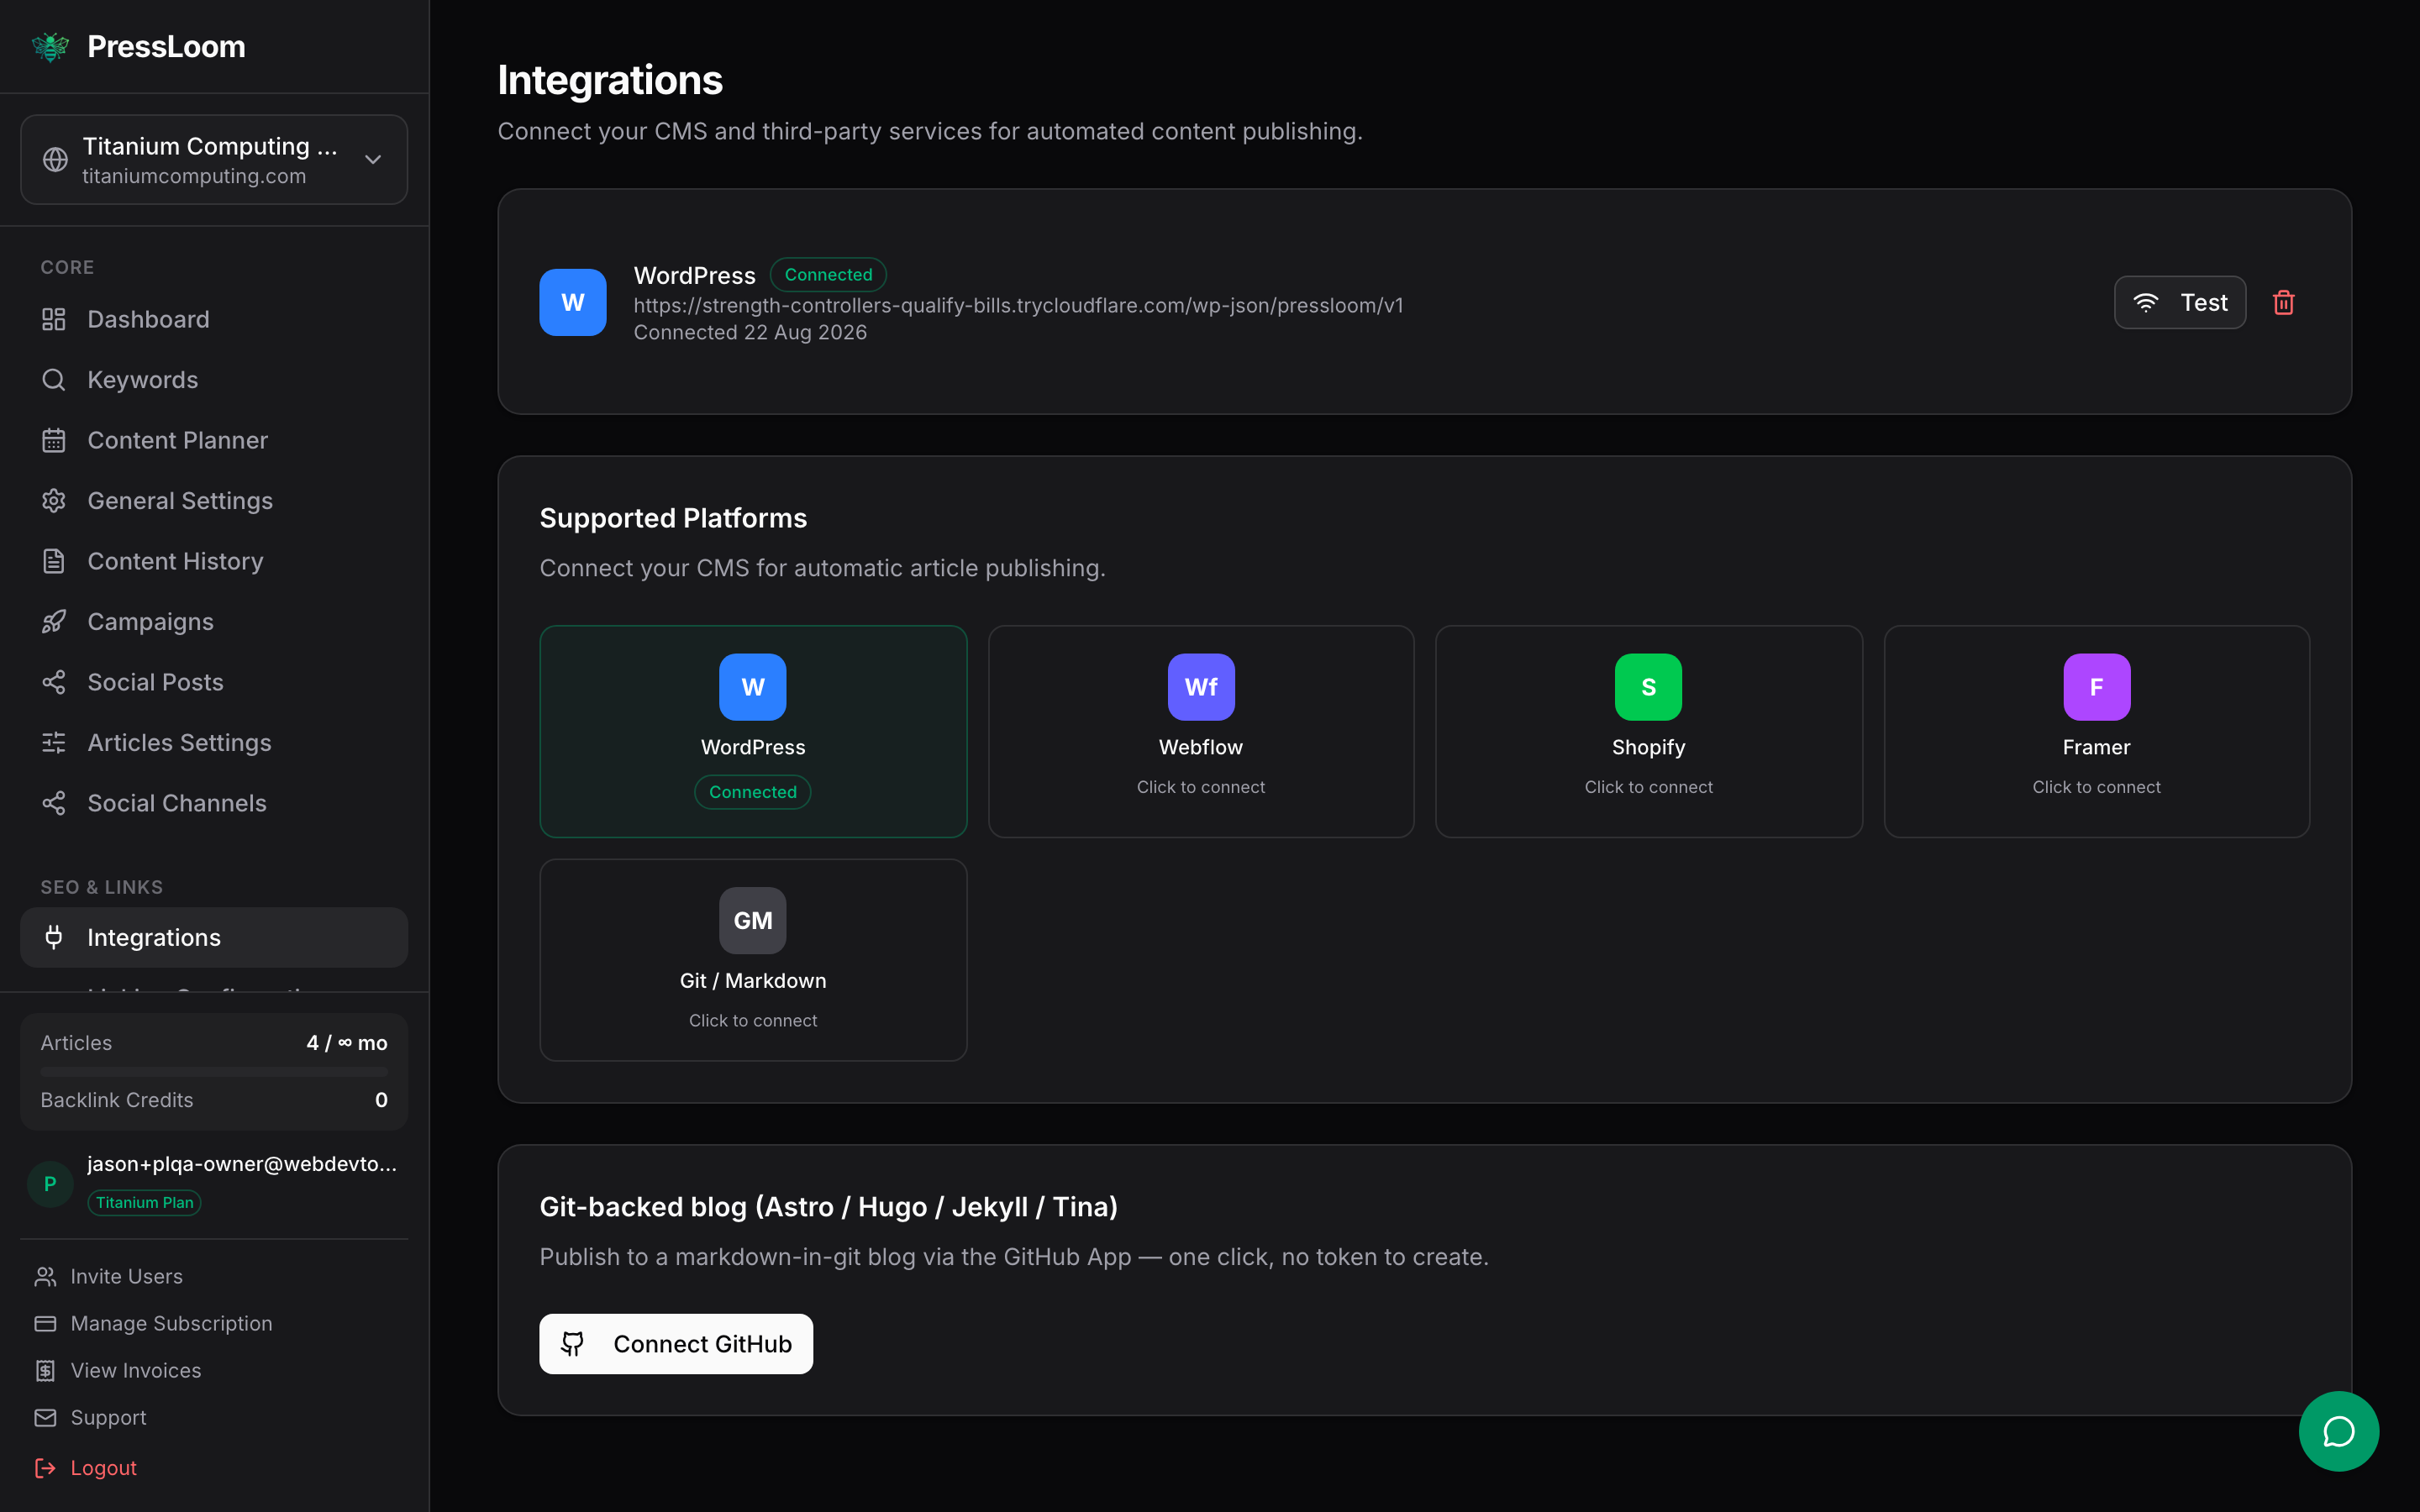
That badge only means the connection is saved. It does not mean PressLoom has reached your site. Press Test to find that out, and press it again any time you change hosting, move domains, or add a security plugin.
WordPress
PressLoom talks to WordPress through a plugin you install on your own site, not through your WordPress username and password. Nothing about your admin login is ever stored in PressLoom.
What you need
- WordPress 6.4 or newer, running PHP 8.0 or newer.
- An account on the site that can install plugins (an administrator).
- The WordPress REST API reachable from the internet. Some security plugins and some hosts block it by default.
The five steps
PressLoom lays these out for you in the WordPress panel, which you reach from the WordPress tile in the onboarding wizard or from the Integrations page.
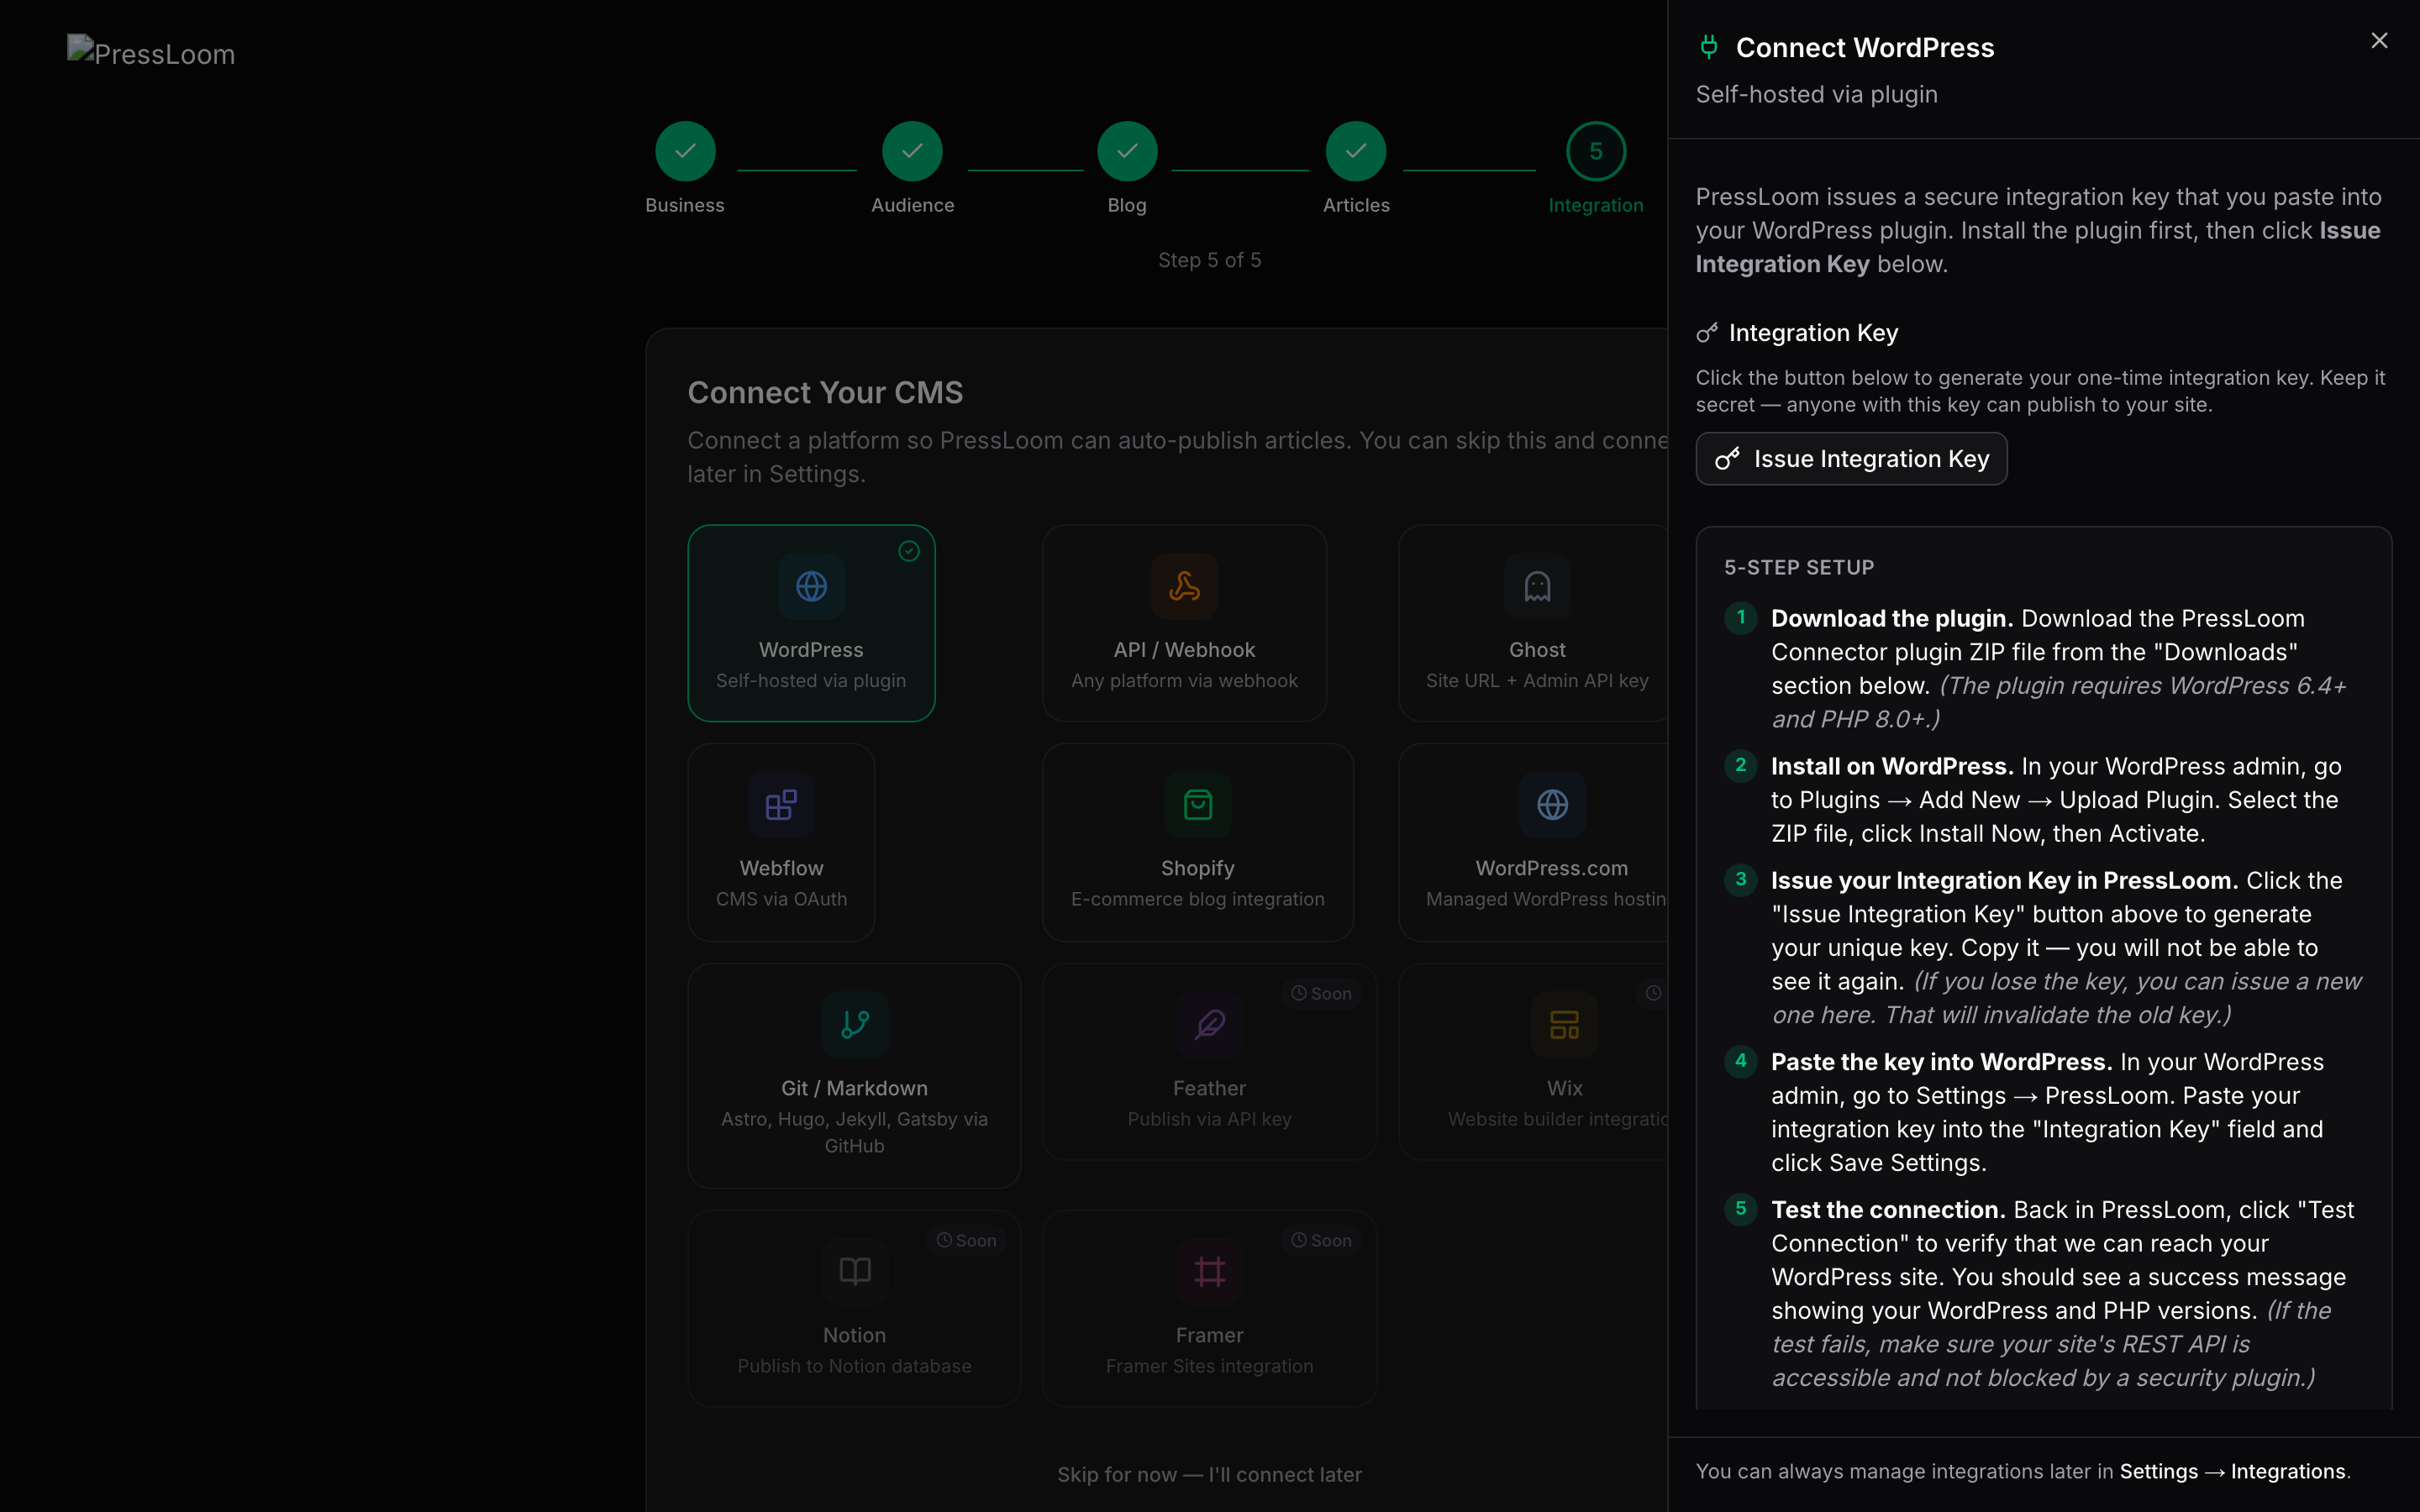
- Download the plugin. Use the "Download the PressLoom Connector plugin" link at the bottom of that panel. It gives you a ZIP file. You want version 1.2.0 or newer.
- Install it on WordPress. In your WordPress admin go to Plugins → Add New → Upload Plugin, choose the ZIP, click Install Now, then Activate. A PressLoom item appears in the left-hand admin menu.
- Issue your integration key. Back in PressLoom, click Issue Integration Key. The key appears once, with a copy button. Copy it now. PressLoom will not show it again, though you can always issue a fresh one, and issuing a fresh one stops the old one working.
- Paste the key into WordPress. In the WordPress admin open PressLoom → Settings. Paste the key into Integration Key. Paste the Server Secret that Titanium gives you into the field below it. Pick a Post Mode, then click Save Settings.
- Test the connection. Back in PressLoom, on the Integrations page, press Test on the WordPress row. A pass reports your WordPress version, your PHP version, and which SEO plugin it found.
PressLoom also needs to know your site's address so it knows where to send
articles. On the Integrations page the WordPress row shows the endpoint it will post
to, which is your site address followed by /wp-json/pressloom/v1. If
that line is blank or points at the wrong domain, fix it before you publish anything.
You enter your site's home address, for example https://example.com, and
PressLoom adds the rest.
The two secrets, and why there are two
The plugin refuses a request unless both of these check out. That is deliberate. One identifies PressLoom as a platform, the other identifies your specific site.
| Field | Where it comes from | Notes |
|---|---|---|
| Integration Key | PressLoom issues it, you copy it | Unique to this website. Shown once. Anyone holding it can post to your site, so treat it like a password and never paste it into an email or a ticket. |
| Server Secret | Titanium gives it to you | Shared by the platform. The plugin stores it hashed, and leaving the field
blank on a later save keeps the current value. Your developer can set it as a
PRESSLOOM_API_SECRET constant in wp-config.php
instead. |
Once the Server Secret is saved, the settings page shows Status: configured. If it says Status: not set, every publish will be rejected with an invalid secret error.
Post Mode
The plugin's Post Mode setting decides what happens to an article the moment it lands.
- Publish Directly. The post goes live on your site as soon as PressLoom sends it.
- Save as Draft. The post lands in WordPress as a draft and waits for a human to press publish. Pick this if you want a read-through before anything is public.
This is a WordPress-side setting, so it wins regardless of what PressLoom sends. If your site keeps ending up with drafts you did not expect, this is the first thing to check.
What actually gets created
Each article becomes a normal WordPress post. PressLoom sends the title, the URL slug, the body, the meta title and meta description, the focus keyword, any categories and tags, an author, and a featured image when one exists. The plugin then writes the SEO fields for whichever SEO plugin you run, and it knows Yoast, Rank Math, All in One SEO, and SEOPress. If you run none of them, the plugin outputs its own Open Graph tags so links still preview properly when the post is shared.
The plugin also keeps a list of everything it received, under PressLoom in the WordPress admin menu, with the title, slug, meta description, status and date of each article.
Every publish creates a new post. WordPress will not let two posts share an address, so publishing the same article a second time gives you a duplicate at a slightly different slug rather than an updated original. Publish once, and if you end up with a duplicate, delete it in WordPress.
When the WordPress test fails
| What you see | What to do |
|---|---|
| No integration key configured | The key never made it into WordPress. Reopen PressLoom → Settings and check the Integration Key field is filled in and saved. |
| Integration key does not match | You are holding two different keys. Issue a new one in PressLoom, paste it into WordPress, save, and test again. |
| Server secret key is invalid | The Server Secret field is empty or wrong. Ask Titanium for the current value and paste it in again. |
| The test times out or cannot reach the site | Something between us and your site is blocking the REST API. Usual suspects are Wordfence and similar security plugins, a firewall rule, HTTP basic auth on a staging site, or a site that is not publicly reachable at all. |
| WordPress cannot create posts | The test creates a draft post and deletes it again. If that fails, the problem is inside WordPress, usually file permissions or a plugin blocking post creation. |
Static sites in a git repository
If your site's source lives in a GitHub repository and your host rebuilds when you push, PressLoom can publish by committing a file. Nothing else about your build changes. This is the path for Astro, Hugo, Jekyll and Eleventy sites, and for Claude Design sites like titaniumcomputing.com.
The plain version of what happens: PressLoom writes one markdown file into your content folder on the branch you nominate, with a normal commit message. Your host sees the push, rebuilds, and the article is live. If you republish the same article it rewrites the same file rather than adding a second one.
Two ways to connect
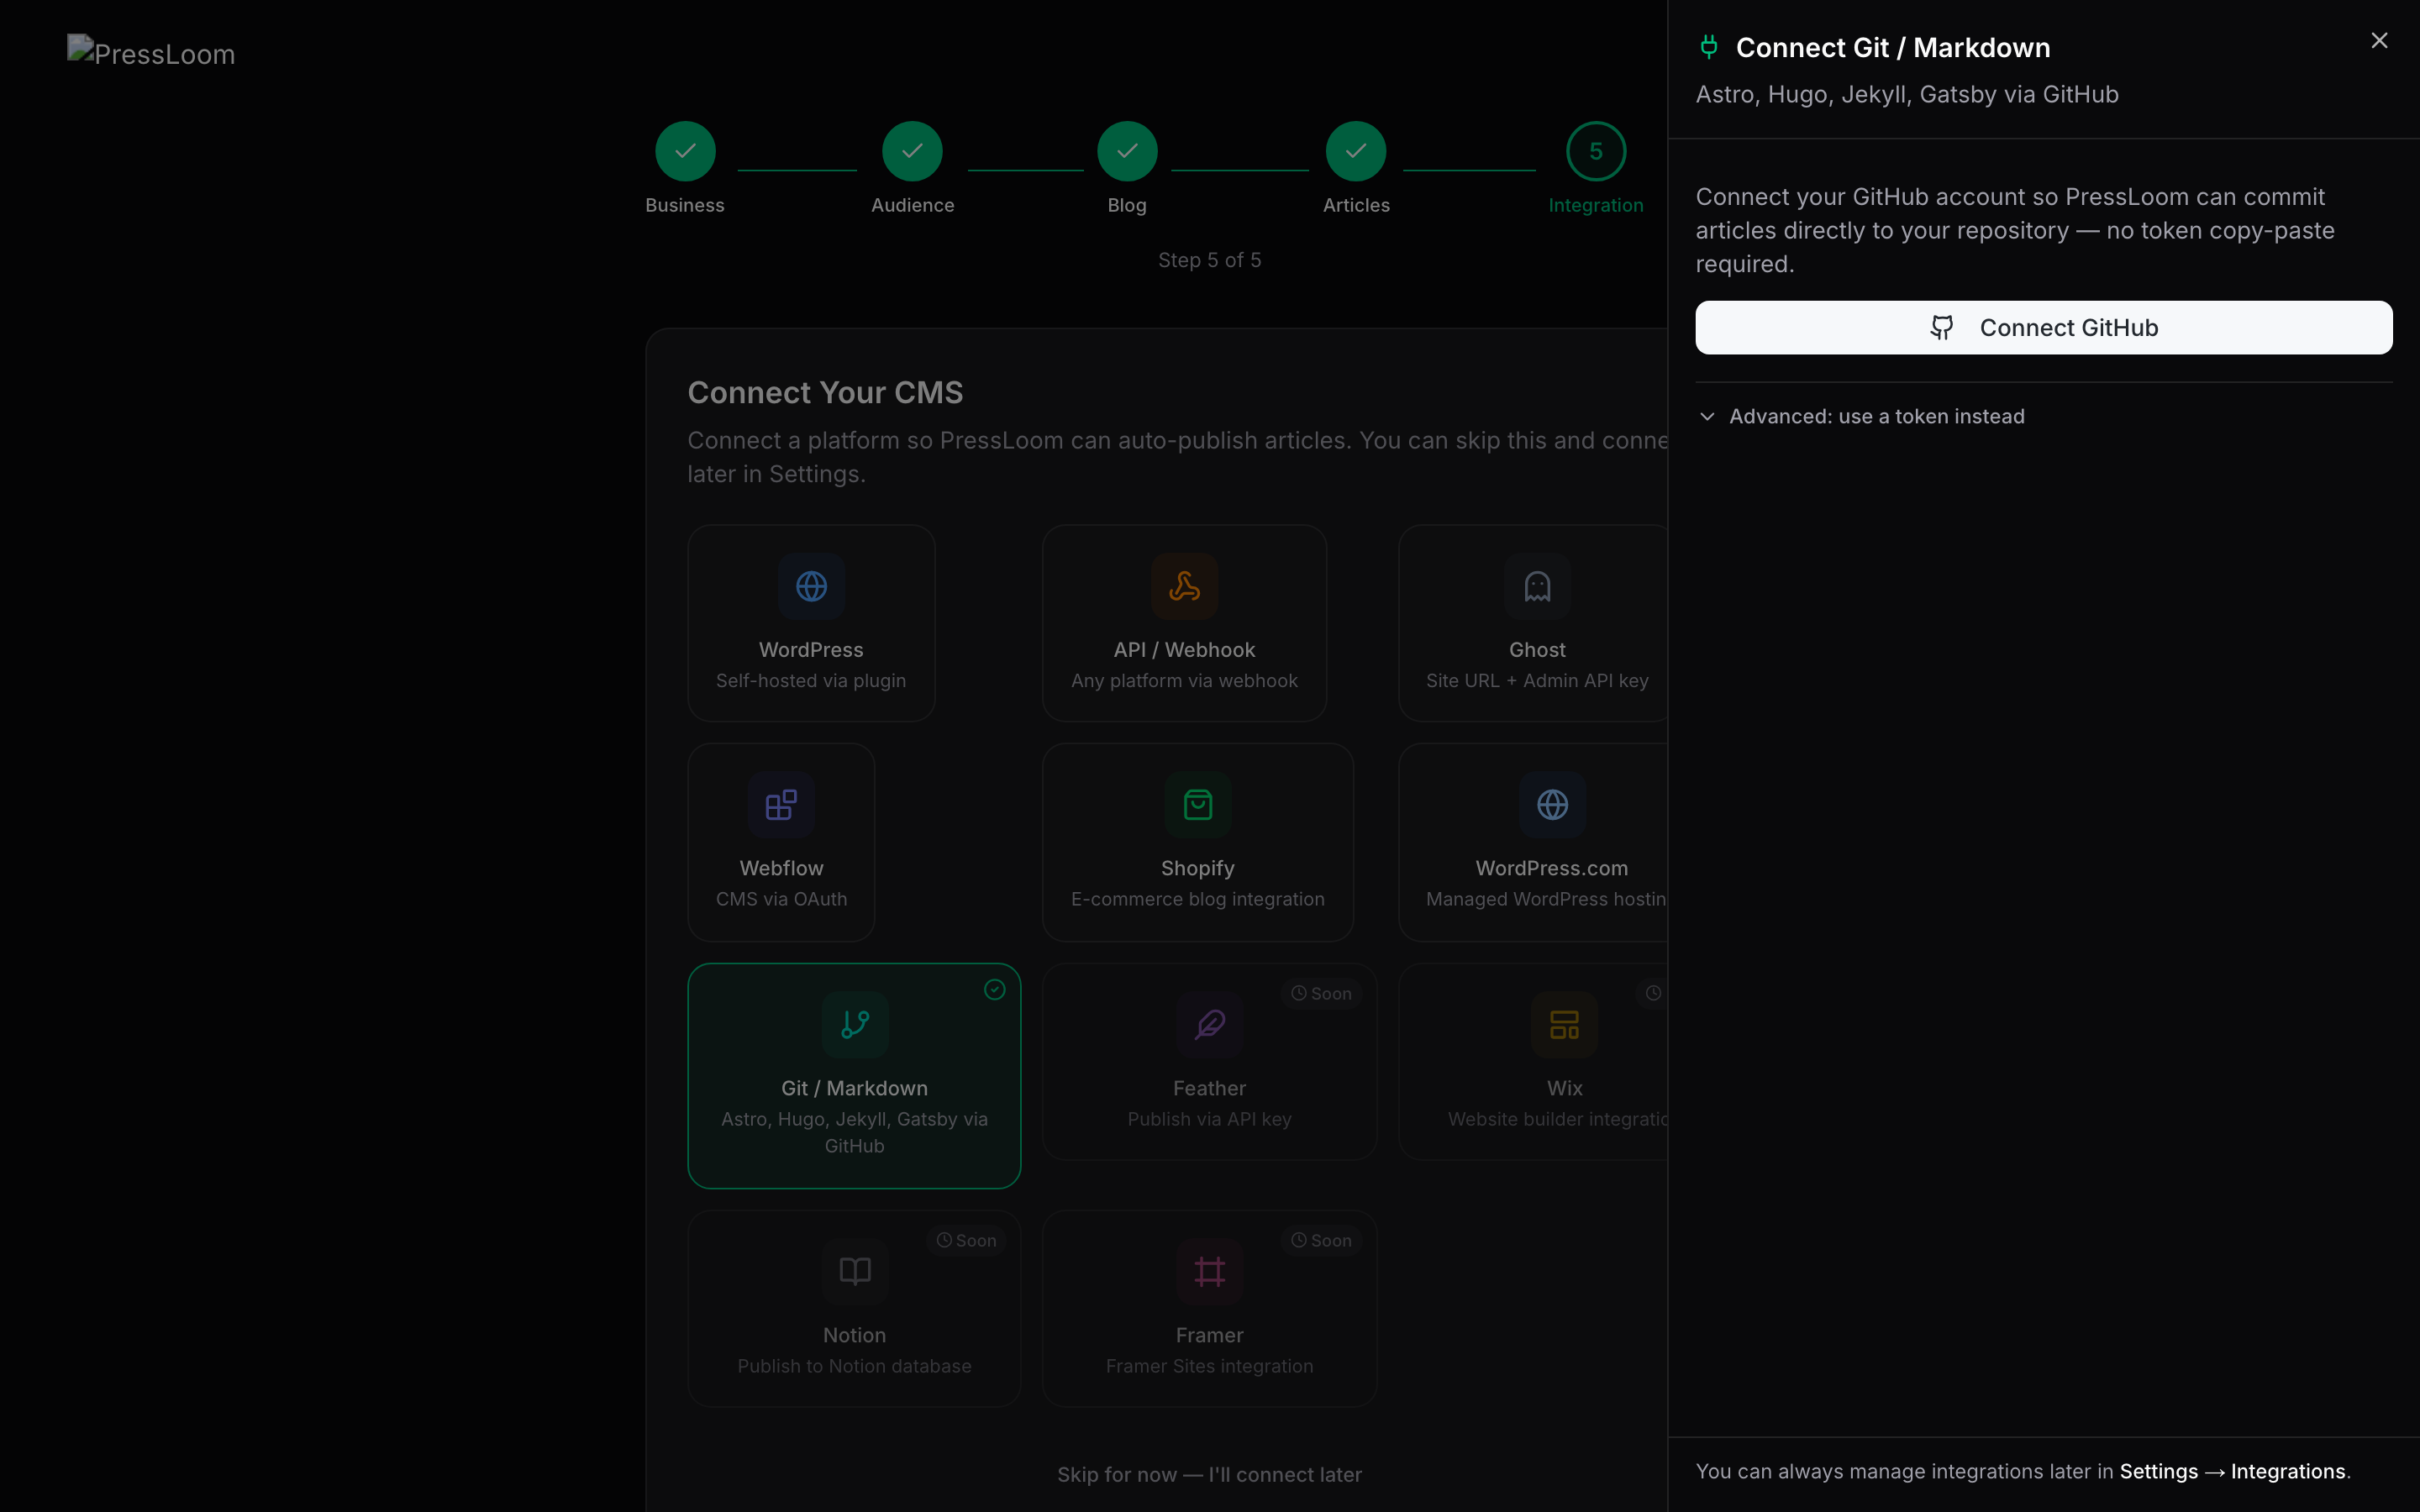
Connect GitHub sends you to GitHub, you choose which repositories to grant access to, and you come back to a repository picker with no token to create or store. This depends on the PressLoom GitHub App being installed for your account. If the button comes back with an error about the GitHub App not being configured, it is not switched on for you yet. Use the token path below, or ask Titanium.
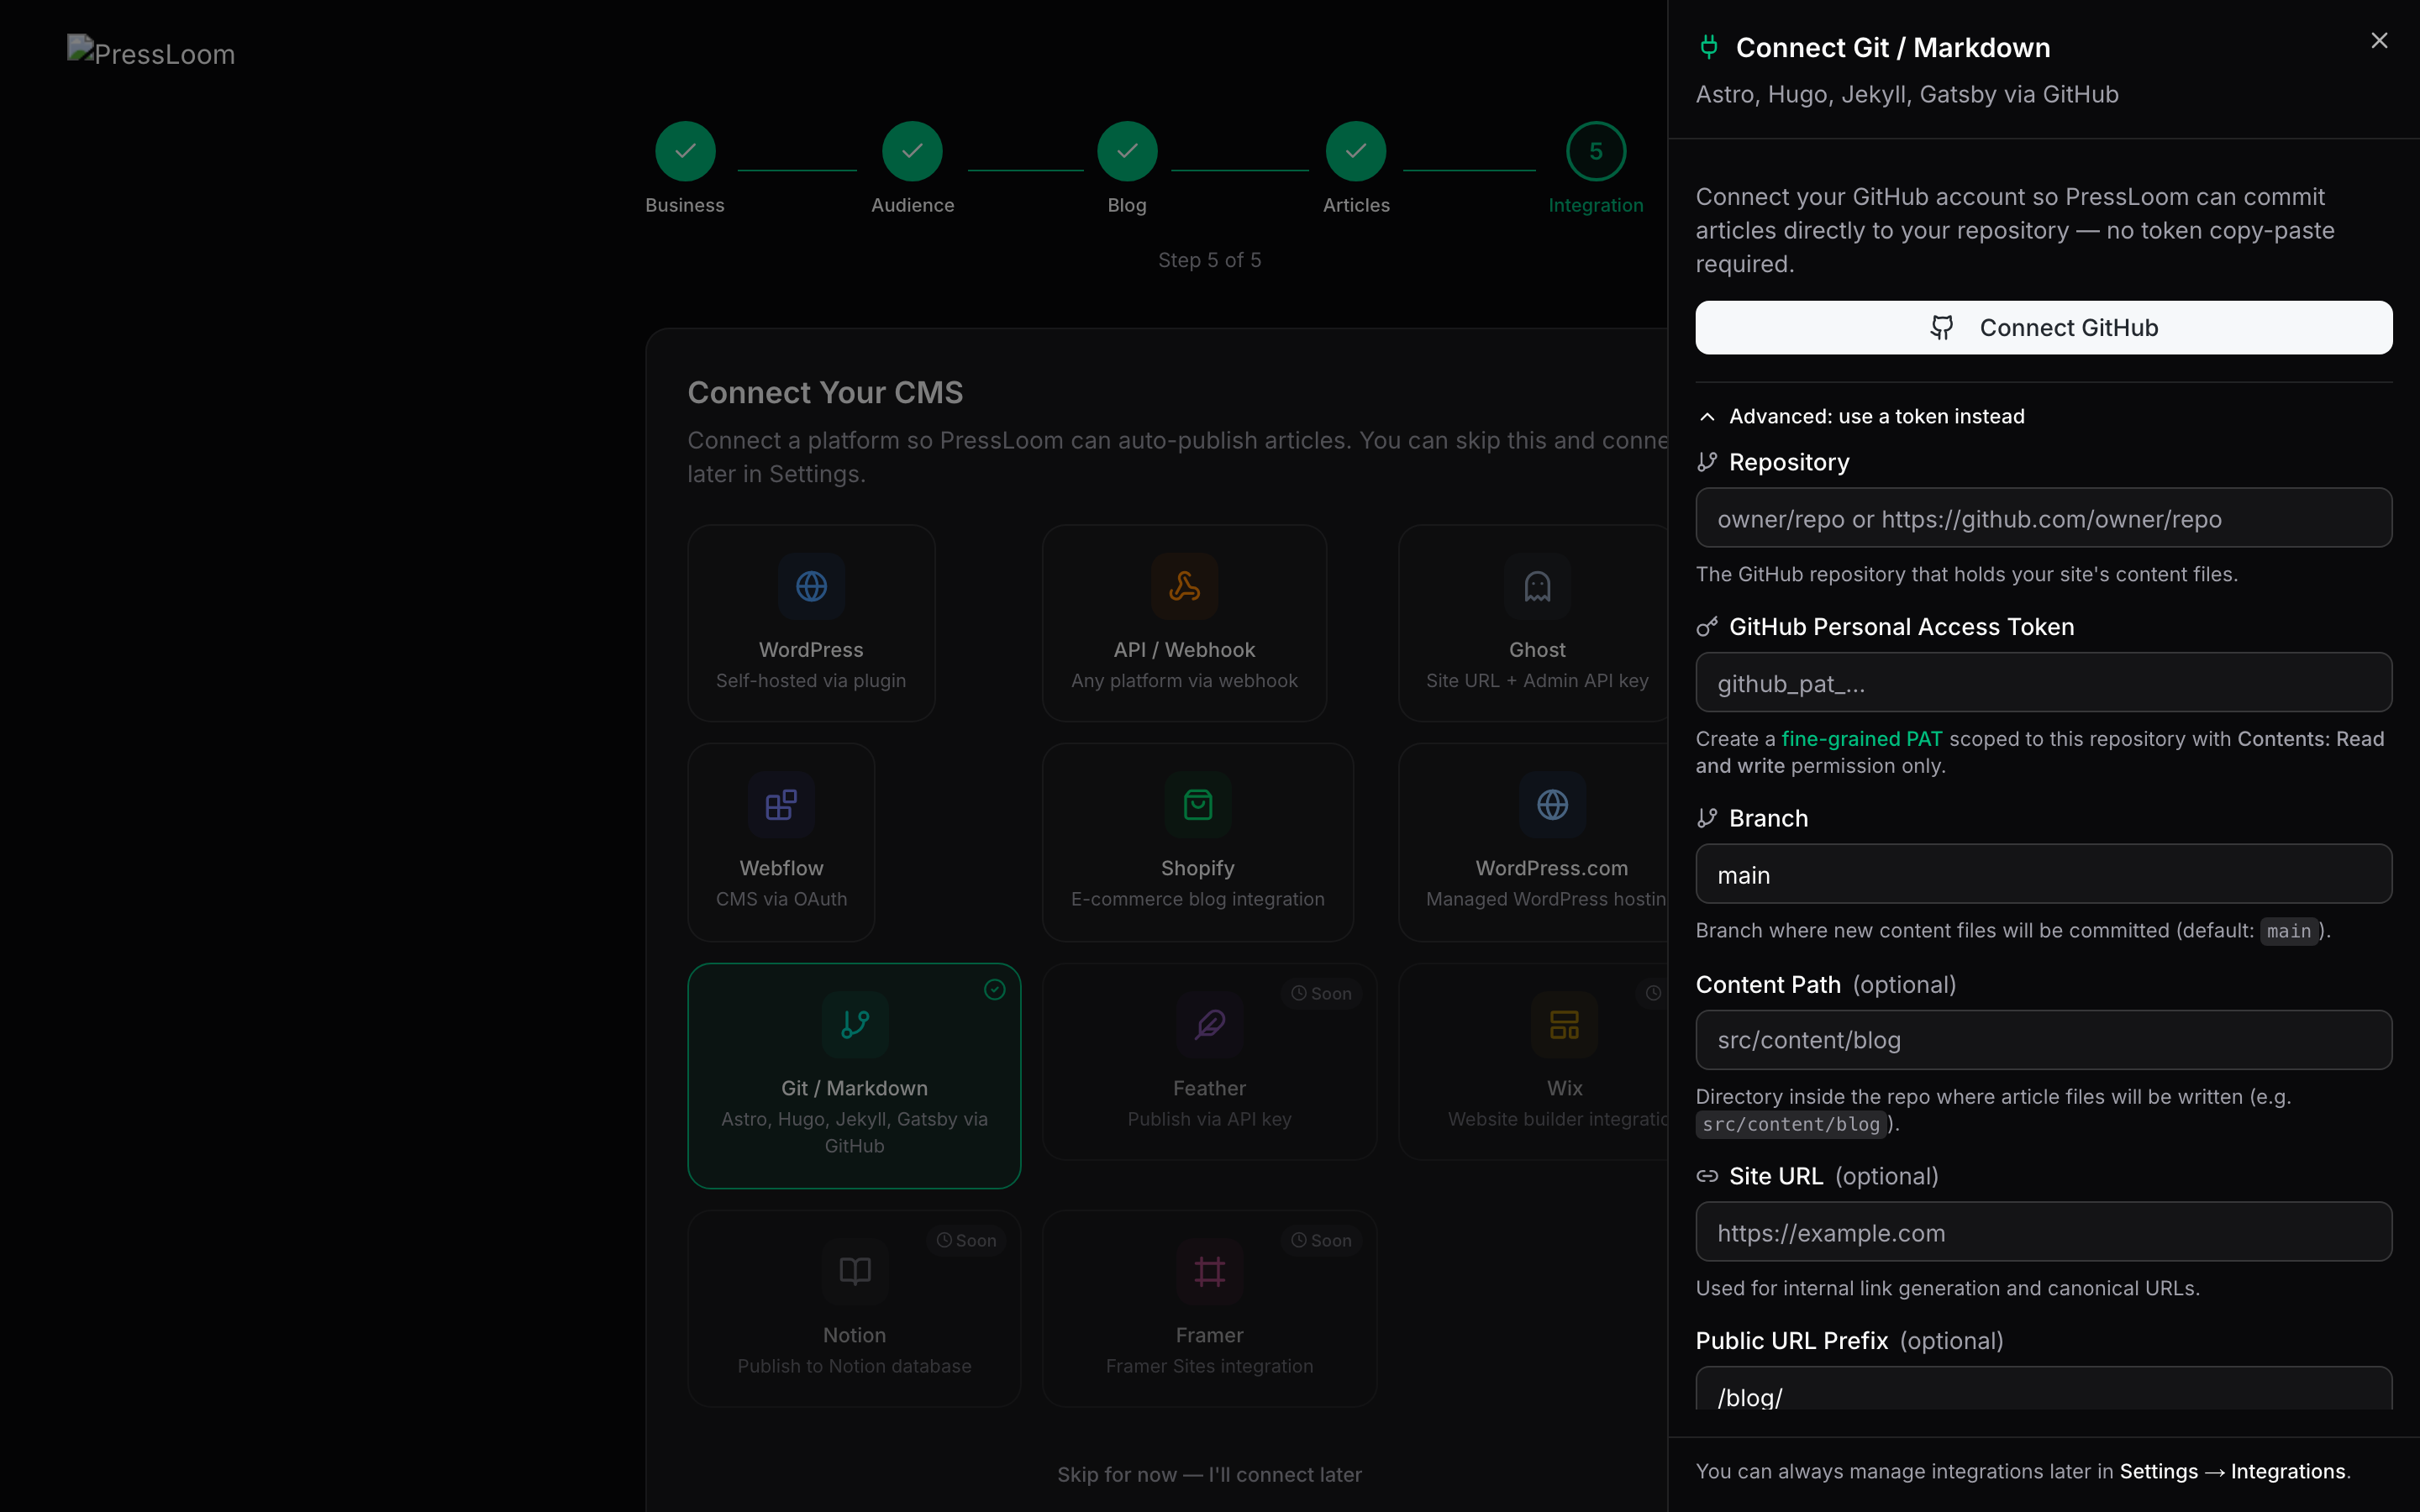
The token path works today on any account. Open Advanced: use a token instead and fill in the form.
Making the token
Use a fine-grained personal access token, not a classic one, and scope it as tightly as GitHub lets you.
- In GitHub go to Settings → Developer settings → Personal access tokens → Fine-grained tokens and generate a new one.
- Under repository access, choose Only select repositories and pick the one repository that holds this site.
- Under permissions, grant Contents: Read and write. Nothing else. That is the whole permission set PressLoom needs.
- Set an expiry you will actually remember. When the token expires publishing stops, and the fix is to make a new token and paste it in again.
- Copy the token and paste it into the GitHub Personal Access Token field.
The fields
| Field | What it means |
|---|---|
| Repository | owner/repo, or paste the full GitHub URL. The repository that
holds your site's source. |
| Branch | The branch to commit to. Usually the one your host builds from, which is
normally main. |
| Content Path | The folder inside the repo where posts live, for example
src/content/blog or content/insights. Get this one
right and everything else follows. |
| Site URL | Your public site address. Used for internal links and canonical URLs. |
| Public URL Prefix | The path posts are served under, for example /insights/.
Defaults to /blog/. This is how PressLoom works out the live
address of an article after it publishes. |
| Body Format | Markdown for most static site generators. HTML when your templates render the body as-is. |
PressLoom looks at the repo first
As soon as you pick a repository, or as soon as both the repository and the token are filled in, PressLoom reads the top of the repo and works out what kind of site it is. It recognises Claude Design sites, Astro, Hugo, Jekyll, Eleventy and Pagiie. When it recognises one you get a green line saying what it found and why, and the branch, content path, URL prefix and body format are filled in for you.
Those pre-filled values are a starting point, not a decision. Every one of them stays editable, and if PressLoom does not recognise the repo it says so and leaves the fields alone rather than guessing.
Sites built as Claude Design packs, which is how titaniumcomputing.com is built,
keep their posts in content/insights and serve them under
/insights/, with the body written as HTML. PressLoom detects that from
the repo and fills those values in. If your repo uses a different folder under
content/, it picks that one up instead.
What lands in the repo
One file per article, named after the article's slug, written into your content folder. Each file starts with a small block of front matter carrying the title, the date, an excerpt and the meta description, and the article body follows. The commit message names the article and says it came from PressLoom, so it is obvious in your history what happened and when.
Publishing the same article again rewrites that same file in place. You will not end up with a folder full of near-duplicate posts.
What happens next is your host's business, not PressLoom's. If your host builds on push, the article goes live a minute or two later. If your build is manual, the file is waiting for your next deploy.
When the git connection fails
| What you see | What to do |
|---|---|
| Token resolves the repo but lacks write access | The token is missing Contents: Read and write. Edit the token's permissions in GitHub, or make a new one. |
| GitHub responded HTTP 404 | Usually the token cannot see that repository at all. Check the repository name, and check the token was scoped to include it. |
| GitHub responded HTTP 401 | The token is wrong, revoked, or expired. Make a new one and paste it in. |
| Articles commit but nothing appears on the site | The commit worked and the build did not, or the content path is not the folder your site actually reads. Check the branch matches the one your host builds, then check the folder. |
Prove it works
Do not wait for the first scheduled article to find out whether the connection is good. Publish one on purpose.
- Press Test on the Integrations page and wait for a pass.
- Open a finished article from Content History.
- Check the URL slug and meta description in the Publishing card on the right, since both are easier to fix before the article is live than after.
- Press Publish.
- Go and look at your site.
There is no confirmation step behind the Publish button. One click and the article is on its way to your site. On WordPress, set Post Mode to Save as Draft while you are still testing.
The Auto-publish switch
Article settings include an Auto-publish switch, and it does two separate jobs.
The first works today. When you press Publish on an article, the switch decides whether PressLoom sends it as published or as a draft. That matters for a git-backed site. It does not matter for WordPress, where the plugin's own Post Mode wins.
The second is generating and publishing on a schedule with nobody pressing anything. That runs once background processing is enabled for your account. Until then, the Publish button on the article page is what sends an article to your site.
Other platforms
The platform grid shows more tiles than are finished, and not every unfinished one is badged, so here is the honest state of it.
- WordPress and Git / Markdown are the two supported paths. They are what this page covers.
- A generic webhook is available in the onboarding picker, for a developer who wants to receive articles as JSON and handle them. Ghost can be connected from that same picker with a site URL and an admin API key.
- Webflow, Shopify, WordPress.com, Framer, Wix and Notion are not ready, whatever their tiles suggest. Email Titanium rather than working through the tile.
Changing or removing a connection
A website holds one connection per platform. Issuing a new WordPress integration key replaces the old one, and the old key stops working the moment you issue the new one, so paste the new key into WordPress straight away or publishing will fail in between. Removing a connection on the Integrations page stops PressLoom publishing there. It does not touch anything already on your site, and it does not delete posts or files that were published earlier.
Rotate the credentials whenever someone with access leaves, when a token leaks, or when you move the site to a new host.